IWMS Access and Set-up
Control Panel File Maintenance (SET 1) - Assigning a Work Station Type
Suggested Order for Setting Up File Maintenance
Control Panel File Maintenance (SET 1) - Assigning a Work Station Type
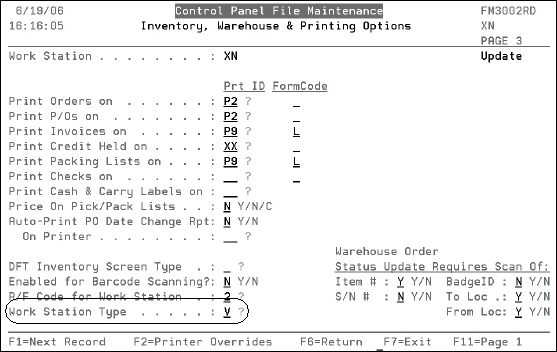
The work station control panel, accessed via SET 1, maintains parameters and options related to each work station or terminal. This section details the settings on the Control Panel that relate to IWMS.
The setting Work Station Type, found on page three, allows you to define what the work station is used for.

For example, if the type is C, it a cutting work station located near a cutting machine, on which orders are updated to the cut (X) status. This feature also allows the cutting station operator to override the default printer selection and choose a different printer. This can reduce the time it takes to retrieve labels, and gives you flexibility in printing labels.
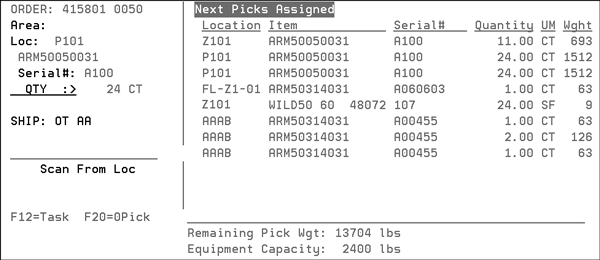
Work Station Type V is for vehicle mounted units and works well with directed picking to show assigned tasks. Only use work station type V if your vehicle mount unit can display a normal 24x80 5250 session. An example of this work station is shown below.

The V type work station is only functional in Build-A-Pallet, since it is the only operation where more than a single pick can be pre-assigned. All other functions only assign a single pick or move, so the additional information is not necessary.
User Settings (WM8 105)
This program contains four settings that provide access and set defaults to parts of IWMS.
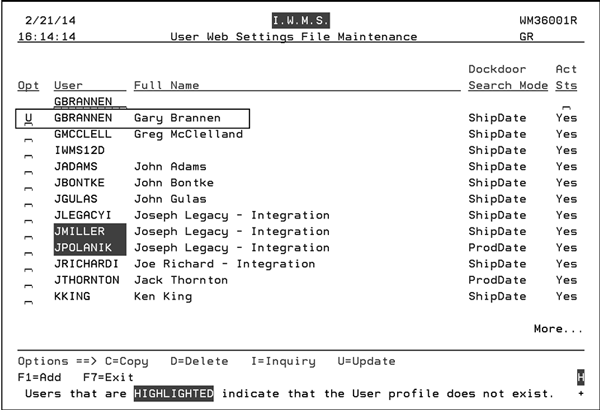
Access the program via menu option WM8 105 - User Settings.
Enter a U to update a user's settings.

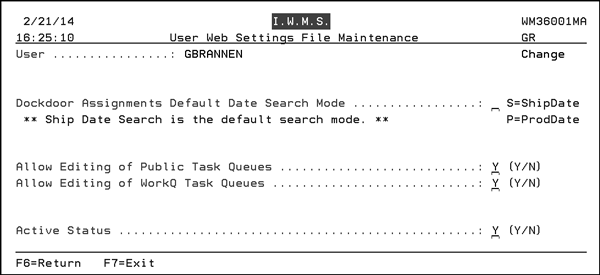
Press Enter to access the following screen. Make the necessary entries.

- Dockdoor Assignments Default Date Search Mode - The Dockdoor Search Mode can either be by actual shipping date (ship date) or the date the material was picked/or needs to be picked (production date). This setting ties into the Dock Door tab of the IWMS website. For more information, refer to Dockdoor Assignments.
- Allow Editing of Public Task Queues - Public task Queues are found on the Task Queue Manager tab of the web based portion of IWMS. They are open for everyone's use and if this field is activated, with a Y, this user has the ability to edit them. For more information, refer to Creating a New Search.
- Allow Editing of WorkQ Task Queues - Private task Queues are found on the Task Queue Manager tab of the web based portion of IWMS. They can only be used by the person who created them or those he has granted permission to. For more information, refer to WorkQueues.
- Active Status - Entering an N in this field essentially drops this user from IWMS and disallows future use.
IWMS Menus
The following table contains brief descriptions of the IWMS menus.
| IWMS Menu | Description |
| WM1 - Physical Warehouse Setup Files | Use the options contained in this menu to set up your warehouses. The options range in scope from configuring an entire warehouse file to assigning dock doors and locations. |
| WM2 - System Settings File | Use this menu to establish IWMS users, keep track of the equipment used in a warehouse, control your cutting stations, and create cycle count rules. |
| WM3 - Warehouse Management Screens |
This menu contains options that assist you in building and implementing plans to improve your warehouse operations. There are also several reporting options available that monitor and measure your progress. |
| WM4 - Warehouse Functions |
The main concept behind all warehouse procedures is that the orders and their status on the system must reflect how they are being processed in reality. The warehouse is the one point in the life of an order where physical events are taking place, such as picking, labeling, loading, and so on, and requires the most system interaction. If the system is not informed that an action has taken place, it will not know that it has happened. It is critically important that all actions taken in the warehouse that affect an order, such as a status change or an order change, are somehow made known to the system. This menu provides all the options to run a warehouse. |
| WM5 - RF Sub-System |
Contains the options that allow you to use an RF device to: receive, putaway, pick, stage, consolidate, and load inventory. There are also options for cycle counts, printing labels, assigning work and equipment.
|
| WM6 - Delivery System | Links you up with the delivery system menu. The delivery system is designed to provide quick access to delivery schedule information. The delivery system also enables warehouse personnel to organize shipments and efficiently process shipping paperwork. |
| WM7 - Receiving System | Provides options that connect you to the Receiving System where you can receive and post inventory into the system. Also included is an option to assign locations for Directed Putaway. |
| WM8 - IWMS System Utilities Menu |
This menu contains several options that can improve your efficiency with IWMS and also decrease, through automation and mass imports, the time required to set up IWMS. Furthermore, there are several options that give you control over the information that is presented on the Web portion of IWMS. |
Warehouses
The warehouses you currently have set up do not automatically show up in the IWMS system, because some customers' warehouses will not implement the IWMS system. You can add new warehouses later with minimal effort.
Passwords
IWMS File Maintenance handles passwords differently than other applications. If you work with windows programs, this method might seem familiar. Because the authority of each menu option can be controlled by the menu system, the password has been moved from the screen to the F23 key. Currently, the same password is used for all of File Maintenance, rather than different passwords for individual options. If you want individual passwords, contact Kerridge to discuss your needs. However, we feel strongly that the security maintained by using the menu system is stronger than it would be using a shared password file. When you select a menu option, you are only prompted to enter a password if one is set up in the password file. Once you enter a password, the system remembers it for as long as you are in the session. You can move from one menu option to another without entering the password, but if you sign off, you must enter the password the next time you sign on and start a new session.
Defaults
On the IWMS File Maintenance screens, fields that are left blank usually to default to N. So, you only need to enter data into fields that you don't want to take the default setting.
F9-Subset
On all IWMS File Maintenance selection screens you can press F9 to filter the records shown on the screen. This feature allows more flexibility than the filtering capability usually available on selection screens. You can also use these subset and filtering capabilities to select records to print when you press F10.
Templates
You can use templates to easily add new location, operator, or equipment records or apply the same changes to more than one record at a time. You do this by setting up a model, or template, of a typical record. Then, you can add new records that will have the same format as the template. The template is linked to the records that use it. So, for example, you could set up a template for a rolled goods location, and then apply that template to a range of rolled goods location records. Then, if you revise the location template, all of the locations based on that template change to match the revised template.
If you have a location that is slightly different from the template, you can assign this unique location to a similar template and remove the link; the data from the template stays in the record. Then, change the value that is different from the template. When the template is changed, the unique location is not changed, since you removed the link to the template and the record no longer matches it.
Suggested Order for Setting Up File Maintenance
1. Set Up Warehouse Settings File
Menu WM2, Option 1 - Think of this as the starting point for all file maintenance activity for a warehouse. Each IWMS warehouse must be set up here. Because of the small number of entries, the system does not have a migration program for this file.
2. Import Current Areas File
Menu WM8, Option 2 - This program prompts you for a warehouse, and then imports all of the areas in your current area file for that warehouse. This tool is useful if you already have areas set up.
3. Import Current Location File
Menu WM8, Option 1 - This program prompts you for a warehouse, and then imports all of the locations in your current location file for that warehouse.
Recommendations for Location, Operator, Equipment, and Include/Omit Functions
We suggest that you build the files in the following order:
- Templates
- Individual records
- Include/omit records
We recommend building the files in this order because, when building individual include/omit records, the IWMS system looks at the templates to determine which records to copy.
Example:
You might have a ceramic location template called CLT. Only the ceramic pickers can pick inventory from that location. These operators are modeled on an operator template called CPR. You would build the files in this order:
- Location template CLT.
- Operator template CPR.
- Individual locations CL1 and CL2; link them to the model CLT.
- Individual operators CP1 and CP2; link them to the model CPR.
Then, fine-tune the include/omit rules for which operators are authorized to these locations.
When maintaining location template CLT, add a record to include only pickers with a template of CPR as authorized operators for these locations. As you add the records, the system finds all of the location records that have a template of CLT (in this case CL1 and CL2) and assigns the authorized operator templates of CPR to them.
When the application finds a request to pick inventory in locations CL1 or CL2, it knows that only operators CP1 and CP2 are authorized to pick from the locations.
4. Location Template File
Menu WM1, Option 6 - Build the models for the locations.
5. Operator Template File
Menu WM2, Option 2 - Build the models for the warehouse operators.
6. Equipment Template File
Menu WM2, Option 4 - Build the models for the warehouse equipment.
7. Areas File
Menu WM1, Option 2 - Build the individual records for the areas.
8. Locations File
Menu WM1, Option 7 - Build the individual records for the locations.
9. Operator File
Menu WM2, Option 3 - Build the individual records for the warehouse operators.
10. Equipment File
Menu WM2, Option 5 - Build the individual records for the warehouse equipment.
11. Mass Apply Location Templates
Menu WM8, Option 3 - Assign templates to a large number of locations at one time. This feature has powerful subset and selection capabilities you can use to review your selections before updating them, so you can test the results before to permanently applying changes.
